doctorwhotoys.net


Exclusive Interview with Edmund Barnett-Ward, Director of Sculpting at Designworks Windsor, the company that sculpts Character Options
Doctor Who Action Figures
This interview took place in Windsor, England on the 27th February 2008 and is Strictly
Copyright © doctorwhotoys.net, All Rights Reserved; may not be reproduced in full or part.
All images are for the exclusive use of doctorwhotoys.net approved by and copyright © Designworks Windsor, Character Group plc and the BBC

Part 1 Behind the Scenes at Designworks
Part 2 All About Ed
Part 3 A Little History
Part 4 The Making of Doctor Who Action Figures
Part 5 Traditional Sculpting
Part 6 Sculpting Materials
Part 7 Approval
Part 8 Digital Sculpting
Part 9 The Sculptors
Part 10 The Story So Far
Welcome to Part 5 of a multi-part 10,000 word series describing in detail the making of Doctor Who Action Figures and including 63 exclusive new images of the figures in various stages of production.
"A sculptor's desk", says Ed, "is a reasonable size; they have a divide in front of them so they have something they can put reference on in front of them. They tend to pin up the larger scale pictures and have the 1:1 scale pictures actually on the desk so they can measure them. Every sculptor has his or her own unique way of working. The majority of times the first things to be done are the joints."
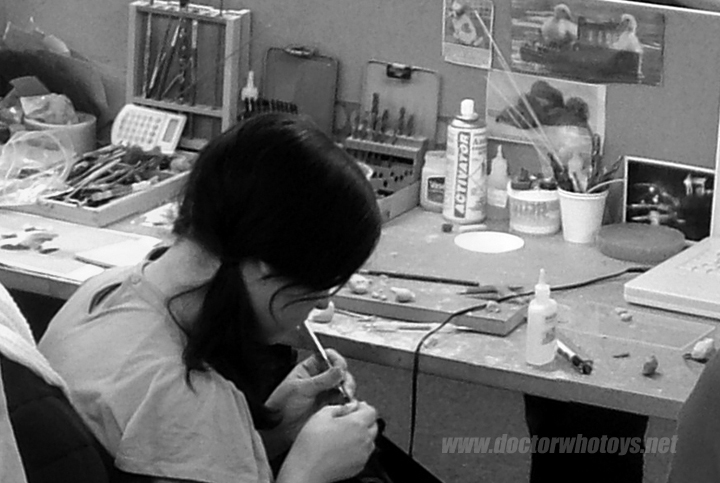
A Sculptor's Desk - All images exclusively approved for use only on doctorwhotoys.net by Designworks, Character Options and the BBC.
"Anybody who has seen the back of a Doctor Who action figure pack will know that the majority of the photographs are of static prototypes of the characters; they don't have the articulation in. That's because the length of turnaround that we have for Doctor Who, as a project, is considerably shorter than most other manufacturing lead times in this kind of industry. Hasbro, for example, always work a year in advance. With Doctor Who, its generally no more than nine months; it can often be six months. The quickest turnaround from sculpt to product was probably the Racnoss Empress which we sculpted in the November before the Christmas episode but was out in January; so less than three months from start to finish. Amongst the slowest turnarounds have been either Captain Jack or Sarah Jane Smith."
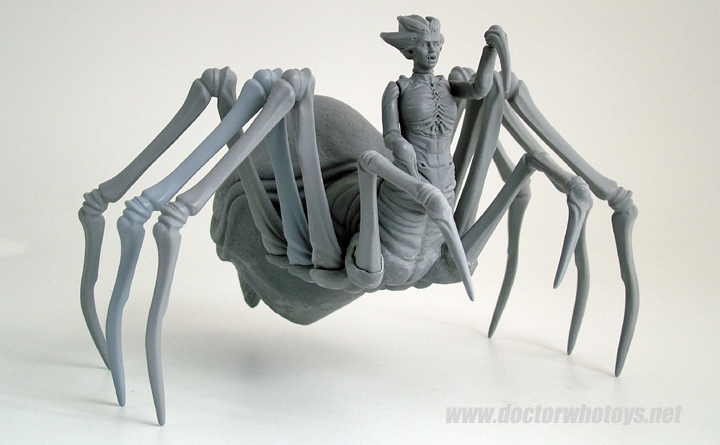
Empress of Racnoss Original Sculpt - All images exclusively approved for use only on doctorwhotoys.net by Designworks, Character Options and the BBC.
"Any actor whose face appears in a Doctor Who episode has right of approval on their figure."
"That's from the lady who played the Gelth Zombie, through to Billie Piper and Freema Agyeman, anybody. The creatures have a faster turnaround because with them you are just consulting with the art department. To get actor approval for a figure can take as many as six sculpts of for example the facial likeness."
"There are likenesses and figures that are more suited to digital sculpting than to physical sculpting. But generally you start with the joints because when you create the joints and you create a skeleton on which to hang the joints you have an armature which forms the basis of the proportions of your figure. This is the simplest process. You can start with a lump and add to it and add to it and end up with a figure, but that can lead to trouble because you have to know that all of the basic requisites of an action figure are in that figure, and the easiest way to do that is to put them in at the start rather than add them in retrospectively."
"We start with a skeleton - a wire armature on which the sculpt is hung."
An arm joint might start at its crudest with two 1 cm roughly cube shaped pieces of epoxy. An epoxy is a two part material - you start off with two sausages of material, you break off equal parts and you mix them together and within about an hour its solid. To get the crude cube shapes, a sculptor will have mixed out a slab of epoxy and put it on their desk, then taken it in to the machine room, machined off a flat face and then drilled it so that the hole is at exactly 90 degrees to the flat face. Some sculptors have more trouble with the model making side of it and so they might get some of their model making colleagues to do the joints if they knew they were going to do them faster."
"As an example I have here in my hand the original sculpt of Doctor Constantine. If I pull off his arm you'll see that this particular sculptor has used brass for a pin, so underneath there will be an armature - a skeleton of the figure using brass wire and epoxy. So they will have blocked out the hips, the chest, the shoulders (so you can work out the shoulder mech arrangement) and to that they will add the relevant joints. In the initial stage with the wire you just literally bend it and glue it, so you super glue it together until you've got your correct armature. Then its a case of cladding that armature in material to create the sculpt. So you build up the leg, and you build up a shape of the muscles underneath."
"In order to get the raw joints to be something useable you cut off, round off, sand off the corners with scalpel and sandpaper The scalpels are just the standard ones such as you would find in an art supply shop. The sandpaper is the regular wet and dry sandpaper used in the automotive industry. In the example of Doctor Constantine a brass tubing was used for the wire armature which was cut with a pipe cutter, then the end filled in with a bit of epoxy. Alternatively, you can take a bit of brass and cut it or part it off using a lathe - cutting a piece of rod very precisely so that you know you've got the exact size you need."
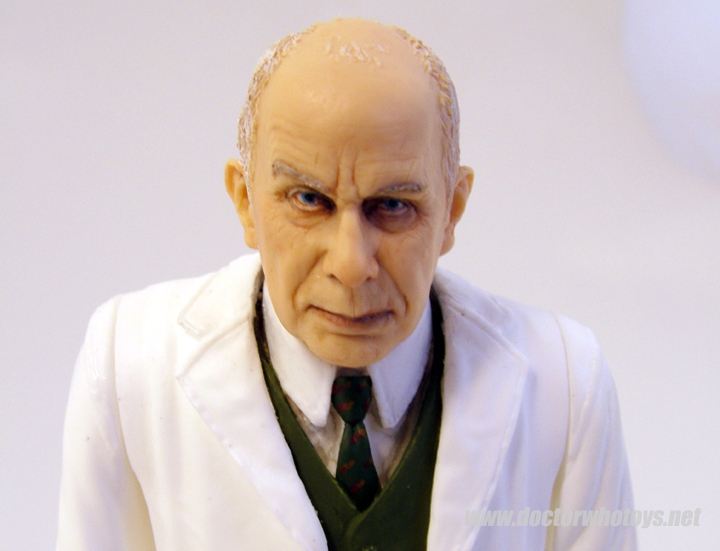
Doctor Constantine Approval Deco - All images exclusively approved for use only on doctorwhotoys.net by Designworks, Character Options and the BBC.
"Designworks have large machines such as the band saw and circular disc sander to help the sculptors rough out a shape. People shape their skeletons, or armatures, on that kind of machinery. The torso, legs, arms and head are all sculpted separately. The hands are sculpted onto the end of the little piece of brass left sticking out of each arm. If the figure has a jacket or coat that will be also be a separate piece made from a sheet of epoxy that has been rolled out flat and molded onto the figure. But there's no hard and fast rule. Some people don't go to the trouble of producing a full armature out of wire. Often in fact people will produce an armature out of the material it's actually sculpted out of. So if I'm going to make for example two legs I get my epoxy resin, and I roll out two sausages that represent the length of the leg, I bake those off so that they are hard and then that forms the basis. I can then just superglue one sausage to one side of the joint and one sausage to the other side of the joint and then I've got the armature, the basis for my sculpt, that I can start putting more material on to build up the actual detail of the leg."
"To get the realism you don't just get a lump of material and try and shape it into a pair of trousers. It doesn't work; you don't get realism that way."
"The best way of doing it (and worth getting) is to create the leg that goes underneath the trousers. Its not like fully detailed with all the hair on it, its just a rough shape that represents where the knee is, where the calf muscle is, where the thigh muscle is. You work on it from an anatomical point of view. So you get the anatomy of the figure, and then you clothe it. Then you add the material on down the front to represent the crease of the trouser. You add the material round to show the cut of the trouser."
Thanks Ed
Now Read Part 6: Sculpting Materials
Ever wondered how your Doctor Who Action Figure was actually made? Don't miss Part 6 in which Ed talks exclusively to doctorwhotoys.net about sculpting materials.
Part 1 Behind the Scenes at Designworks
Part 2 All About Ed
Part 3 A Little History
Part 4 The Making of Doctor Who Action Figures
Part 5 Traditional Sculpting
Part 6 Sculpting Materials
Part 7 Approval
Part 8 Digital Sculpting
Part 9 The Sculptors
Part 10 The Story So Far
This interview is Strictly Copyright © doctorwhotoys.net, All Rights Reserved; may not be reproduced in full or part. All images are for the exclusive use of doctorwhotoys.net approved by and copyright © Designworks Windsor, Character Group plc and the BBC
List Portraits 12" Gallery News Contact
Content is copyright © doctorwhotoys.net